Uncategorized
Spring ME Supporting Namespaces? 
Wilfred Springer 11 Nov, 2009


Many developers prefer microservices architecture to build their applications. Microservices is the right choice if you have to build a scalable and enterprise-scale application, but if you just need a small web application, then using microservices architecture will be an overkill as managing deployment and other aspects will be time consuming.
A better alternative is to use spring boot and angular to build simple web applications, and they can be deployed in a single jar file. This blog describes how to build a web application with Angular and Spring Boot.
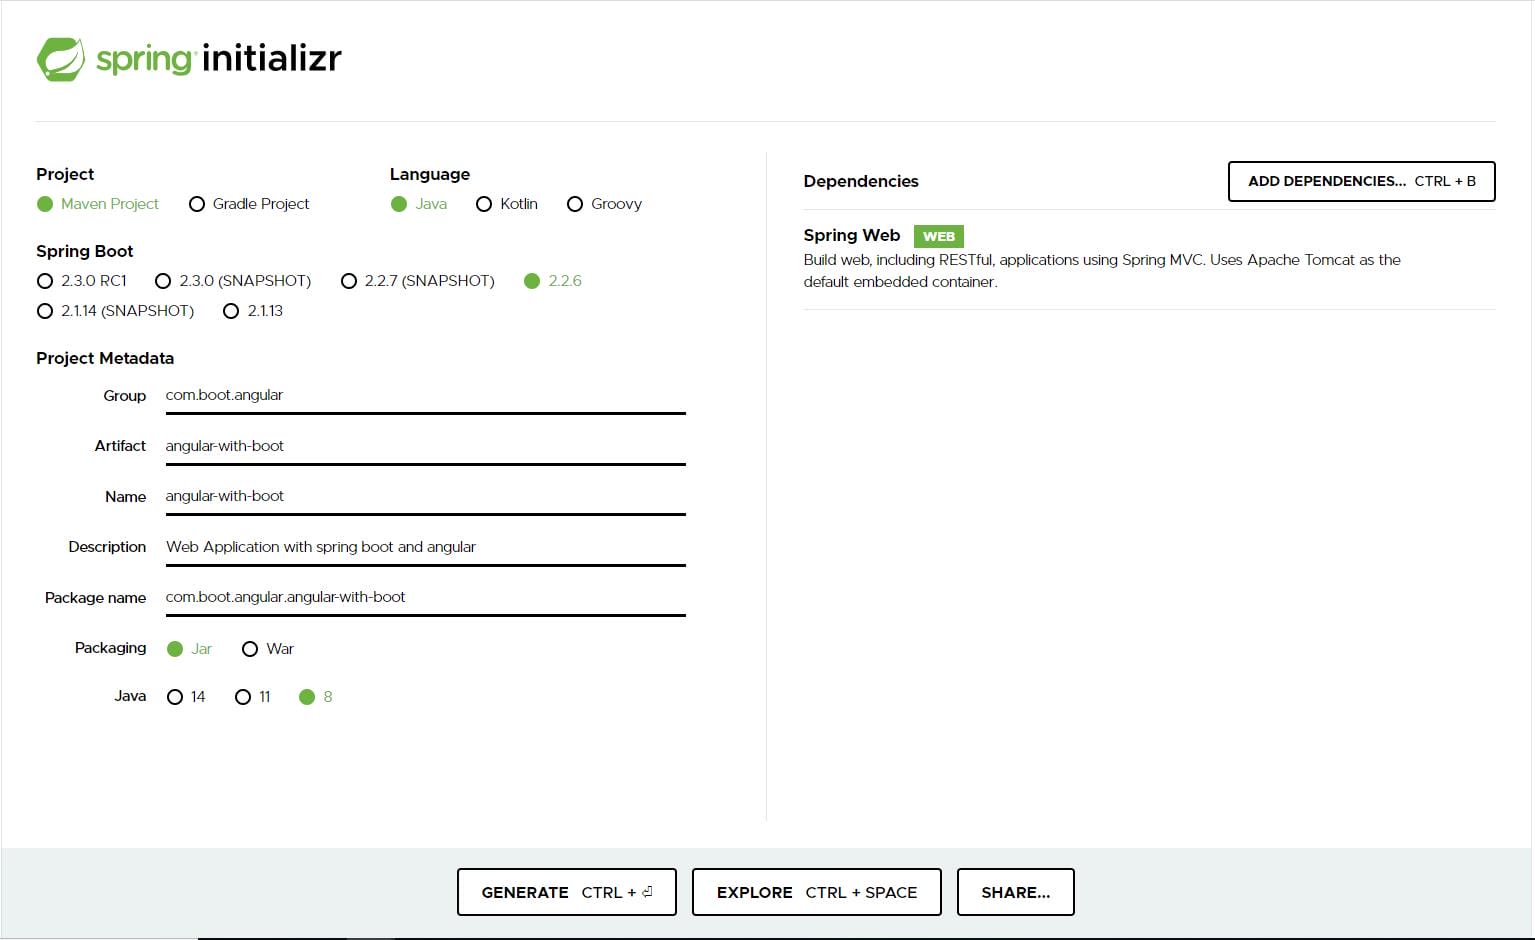
Step 1: Using spring initializer create a project structure as shown below
 Step 2: Import the project into your IDE (eclipse, intellij etc.), and start building your java code with rest apis to serve the angular application. A sample rest api code to show the application name in the angular ui is given below:
ApplicationController.java
package com.boot.angular.angularwithboot.controller;
import org.springframework.http.HttpStatus;
import org.springframework.http.ResponseEntity;
import org.springframework.web.bind.annotation.GetMapping;
import org.springframework.web.bind.annotation.RequestMapping;
import org.springframework.web.bind.annotation.RestController;
@RestController
@RequestMapping(“/api/v1/application”)
public class ApplicationController {
@GetMapping
public ResponseEntity<String> appName() {
return new ResponseEntity<String>(“Web application with spring boot and angular”, HttpStatus.OK);
}
}
Step 3: Run the application, and check whether you can access the rest api through curl command.
![]() The spring boot application development is done and now create the angular application. As we are integrating both applications in a single jar and single git repository, follow the procedure described below to make it into a single package.
The spring boot application development is done and now create the angular application. As we are integrating both applications in a single jar and single git repository, follow the procedure described below to make it into a single package.
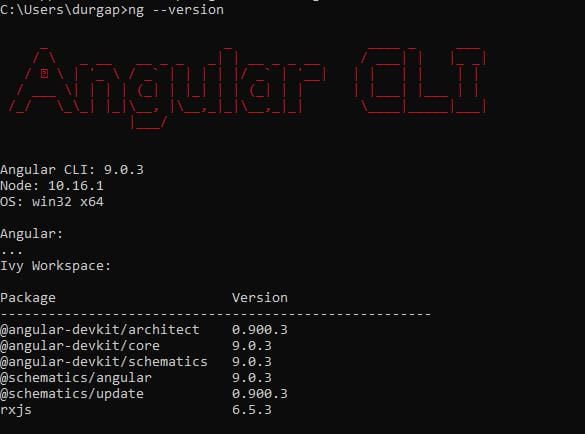
Step 4: To create the angular application, install the following tools in your system:
npm installation can be done as part of node js installation, use the following
npm install -g @angular/cli
command to install angular cli. After installation check the version of boot node and angular.
 Step 5:
As the tools are in place now, start building the angular application. Open command prompt and navigate to spring boot application root folder.
Ex: E:PamarthiProjectslearnblogangular-with-boot
Follow the angular cli commands to create the angular application Skelton
ng new ui
This will generate code in the ui folder:
cd ui
ng serve
Open http://localhost:4200/ to check the default page of the angular application.
Step 6:
Create the angular service to get the application name from the spring boot API. Open the ui application in visual studio code editor to make code changes.
ng g s services/application
This command will generate the angular service.
Step 7:
Use a http getcall to the spring boot API to fetch the application name:
import { Injectable } from ‘@angular/core’;
import { HttpClient } from ‘@angular/common/http’;
@Injectable({
providedIn: ‘root’
})
export class ApplicationService {
constructor(private http: HttpClient) { }
getApplicationName() {
return this.http.get(“/api/v1/application”);
}
}
Step 8:
Inject this service into the app.component.ts to render in ui.
import { Component } from ‘@angular/core’;
import { ApplicationService } from ‘./services/application.service’;
@Component({
selector: ‘app-root’,
templateUrl: ‘./app.component.html’,
styleUrls: [‘./app.component.scss’]
})
export class AppComponent {
title = ”;
constructor(private applicationService: ApplicationService) {
applicationService.getApplicationName().subscribe((resp: any) => {
this.title = resp;
})
}
}
As the spring boot service implementation and ui changes are done, now make a single build to deploy the application.
Step 9:
To make configuration changes in pom.xml, add one plugin to build the angular application production ready code and place it into the resources folder of the spring boot application. Add this configuration in pom.xml to
<build>
<finalName>angular-with-boot</finalName>
<resources>
<resource>
<directory>${basedir}/src/main/resources</directory>
<filtering>true</filtering>
</resource>
</resources>
<plugins>
<plugin>
<groupId>org.springframework.boot</groupId>
<artifactId>spring-boot-maven-plugin</artifactId>
</plugin>
<plugin>
<groupId>org.apache.maven.plugins</groupId>
<artifactId>maven-jar-plugin</artifactId>
<configuration>
<archive>
<manifest>
<mainClass>com.boot.angular.angularwithboot.AngularWithBootApplication</mainClass>
</manifest>
</archive>
</configuration>
</plugin>
<plugin>
<artifactId>maven-resources-plugin</artifactId>
<executions>
<execution>
<id>copy-resources</id>
<phase>process-sources</phase>
<goals>
<goal>copy-resources</goal>
</goals>
<configuration>
<outputDirectory>${project.basedir}/src/main/resources/static</outputDirectory>
<resources>
<resource>
<directory>${project.basedir}/ui/dist/ui</directory>
<filtering>true</filtering>
</resource>
</resources>
</configuration>
</execution>
</executions>
</plugin>
</plugins>
</build>
<profiles>
<profile>
<id>build-ui</id>
<build>
<plugins>
<plugin>
<groupId>org.codehaus.mojo</groupId>
<artifactId>exec-maven-plugin</artifactId>
<executions>
<execution>
<id>install frontend-app</id>
<phase>generate-sources</phase>
<goals>
<goal>exec</goal>
</goals>
<configuration>
<executable>node</executable>
<arguments>
<argument>${project.basedir}/ui-build-install.js</argument>
<argument>npm</argument>
<argument>install</argument>
</arguments>
</configuration>
</execution>
<execution>
<id>build ui</id>
<phase>generate-sources</phase>
<goals>
<goal>exec</goal>
</goals>
<configuration>
<executable>node</executable>
<arguments>
<argument>${project.basedir}/ui-build-install.js</argument>
<argument>ng</argument>
<argument>build</argument>
<argument>–prod</argument>
</arguments>
</configuration>
</execution>
</executions>
</plugin>
</plugins>
</build>
</profile>
</profiles>
Step 10:
Add one more file in the root folder to build the angular application.
ui-build-install.js
const args = process.argv;
var exec = require(‘child_process’).execSync;
var cmd = “cd ui && “+ args[2]+” ” + args[3] +” “+args[4] ;
var options = {
encoding: ‘utf8’
};
console.log(exec(cmd, options));
Step 11:
Now let’s build the jar file with angular code:
mvn clean install -P build-ui
The folllwoing command will generate the jar file:
java -jar targetangular-with-boot.jar
Access the link http://localhost:8080/, see the angular application with java service call, and observe whether application name in the ui is from the spring boot service. Now, your web application is ready to be deployed.
Complete sample code for the illustration shown above available in GitHub.

